Social Icons

Sunday, November 14, 2010

How Blu-ray Discs Work

In 1997, a new technology emerged that brought digital sound and video into homes all over the world. It was called DVD, and it revolutionized the movie industry.

The industry is set for yet another revolution with the introduction of Blu-ray Discs (BD) in 2006. With their high storage capacity, Blu-ray discs can hold and play back large quantities of high-definition video and audio, as well as photos, data and other digital content.

In this article, I'll explains how the Blu-ray disc works and how it was developed, and we'll see how it stacks up against some other new digital video formats on the horizon.

A current, single-sided, standard DVD can hold 4.7 GB (gigabytes) of information. That's about the size of an average two-hour, standard-definition movie with a few extra features. But a high-definition movie, which has a much clearer image, takes up about five times more bandwidth and therefore requires a disc with about five times more storage. As TV sets and movie studios make the move to high definition, consumers are going to need playback systems with a lot more storage capacity.

Blu-ray is the next-generation digital video disc. It can record, store and play back high-definition video and digital audio, as well as computer data. The advantage to Blu-ray is the sheer amount of information it can hold:

  • A single-layer Blu-ray disc, which is roughly the same size as a DVD, can hold up to 27 GB of data -- that's more than two hours of high-definition video or about 13 hours of standard video.
  • A double-layer Blu-ray disc can store up to 50 GB, enough to hold about 4.5 hours of high-definition video or more than 20 hours of standard video. And there are even plans in the works to develop a disc with twice that amount of storage.

Friday, October 22, 2010

How to Use Microsoft Office Outlook Connector

If you are still using Hotmail but would prefer to access your email from a desktop client, then you might be interested to know that Microsoft has released a connector that will allow you to send and receive Hotmail or Office Live Mail through Outlook 2003 or 2007.

This is especially helpful for those of us that maintain a hotmail account but don’t like to ever check it because we don’t use it all that often.

Installation

Make sure that Outlook is closed, and then download and install the Microsoft Office Outlook Connector. Open Outlook and you’ll immediately be prompted with the settings dialog.

Enter in your account details into this screen, and then close the dialog. You’ll be prompted to restart Outlook again.

image

Once you’ve restarted, you’ll now see your Hotmail account in the list of mail accounts, and you can send/receive to download your messages.

image

If you want to send email with the hotmail account, you’ll notice a new drop-down for Account, which will let you switch the account you are sending the email as.

image

Hopefully this will save you some of the pain of the slow-loading hotmail website.

Download Microsoft Office Outlook Connector from Microsoft.com

Wednesday, October 6, 2010

Download TC++


OR

Click Here For Mirror

password is: funter_tt

5 minutes of eye-opening

ابو ھریرۃ رضي الله عنه سے روایت ہے

" ایک شخص ساٹھ سال تک نماز پڑھتا ہے

مگر اسکی ایک نماز بھی قبول نہیں ہوتی"

پوچھا گیا : وہ کیسے ؟؟

انہوں نے کہا : کیونکہ نہ وہ اپنا رکوع پورا کرتاہے اور نا سجود

نا قیام پورا کرتا ہے نا اس کی نماز میں خشوع ہوتا ہے


حضرت عمر رضي الله عنه نے فرمایا :
ایک شخص اسلام میں بوڑھا ہوگیا
اور ایک رکعت بھی اسنے اللہ کے لیے مکمل نہیں پڑھی

پوچھا گیا کیسے یا امیر المومنین ؟

فرمایا :

اسنے نا اپنا رکوع پورا کیا اور نا سجود

امام احمد بن حنبل رحمہ اللہ نے فرمایا

ایک زمانہ لوگوں پر ایسا آئے گا"

لوگ نماز پڑھیں گے مگر انکی نماز نہیں ہوگی

اور مجھے ڈر ہے کہ وہ زمانہ یہی زمانہ ہے"

امام اگر آج کا زمانہ آکر دیکھ سکتے تو کیا کہتے ؟؟

امام غزالی رحمه الله نے فرمایا:

ایک شخص سجدہ کرتا ہے اس خیال سے کہ اس سجدہ سے اللہ کا تقرب حاصل کرے گا

اس اللہ کی قسم اگر اس کے اس سجدے کا گناہ تقسیم کیا جائے تو سارا بلد ھلاک کر دیا جائے
پوچھا گیا وہ کیسے ؟؟

فرمایا:

وہ اپنا سر اپنے اللہ کے سامنے جھکاتا ہے

مگر اپنے نفس ،گناہوں، اپنی شہوات اور دنیا کی محبت میں مصروف ہوتا ہے

تو یہ کیسا سجدہ ہے ؟؟؟
ہمارے نبی صلی اللہ علیہ وسلم نے فرمایا

میری آنکھون کی ٹھنڈک نماز میں رکھی گئی ہے

تو کیا کبھی آپ نے ایسی نماز پڑھی جو آپکے آنکھوں کی ٹھنڈک بنی ہو ؟؟؟
کیا کبھی آپ گھر کی طرف تیزی سے پلٹے صرف دو رکعت کی ادائیگی کی نیت سے ؟؟

کیا کبھی نماز کی محبت نے آپ کو بے چین کیا ؟؟
کیا کبھی آپ نماز کے لیے ترسے ؟؟

کیا کبھی آپ نے رات کا بے چینی سے انتظار کیا

تاکہ آپ اپنے رب کے ساتھ اکیلے نماز میں ملاقات کر سکیں ؟؟
اللہ سبحانہ کا ارشاد ہے :

(( ألم يأن للذين آمنوا أن تخشع قلوبهم لذكر الله ))
کیا ابھی تک مومنوں کے لئے اس کا وقت نہیں آیا کہ اللہ کی یاد سے ان کے دل نرم ہوجائیں؟؟؟؟

ابن مسعود رضي الله عنه فرماتے ہیں

ہمارے اسلام لانے کے چار سال بعد یہ آیت نازل ہوئی
اس ایت میں اللہ سبحانہ نے ہم سے شکایت کی

ہم سب بہت رویے

اپنے قلۃ خشوع پر

پھر ہم گھروں سے نکلتے تو ایک دوسرے کو عتاب کرتے اور کہتے

کیا تم نے اللہ سبحانہ کا یہ فرمان نہیں سنا ؟؟؟

(( ألم يأن للذين آمنوا أن تخشع قلوبهم لذكر الله ))
کیا ابھی تک مومنوں کے لئے اس کا وقت نہیں آیا کہ اللہ کی یاد سے ان کے دل نرم ہوجائیں؟؟؟؟

تو لوگ گر جاتے اور رونے لگتے

اللہ کے اس عتاب پر

تو کیا کبھی آپ نے یہ محسوس کیا اس آیت سے؟؟

کہ اللہ تعالی آپ سے شکوہ کر رہا ہے ؟؟


اپنی نمازوں کو ضائع ہونے سے بچائیں

اپنے تمام دوستوں کو یہ میل نشر کریں

اور اگر آپ پر یہ بھاری ہو تو جان لیجیئے

آپ کے گناہ اس کام میں رکاوٹ ہیں

إذا ضاقت عليك الأرض بما رحبت، وضاقت عليك نفسك بما حملت فاهتف ... يا الله

لا إله إلا الله رب السموات السبع ورب العرش العظيم

Wednesday, August 11, 2010

How to Configure Windows XP for PPPoE

To create a broadband connection using PPPoE, use the following procedure:

  1. Click Start, click Control Panel, click Network and Internet Connections, and then click Network Connections.

  2. Under Network Tasks, click Create a new connection, and then click Next.

  3. Click Connect to the Internet, and then click Next.

  4. Click Setup my connection manually, and then click Next.

  5. Click Connect using a broadband connection that requires a user name and password.

  6. In the Connection Name dialog box, type the name of the ISP. This becomes the name of the connection. Click Next.

  7. In the Internet Account Information dialog box, type the user name and password. Additional checkboxes allow you to specify whether this connection and its user name and password is available to all users (selected by default), whether this connection is your default Internet connection (selected by default), and whether to enable the Internet Connection Firewall on the connection (enabled by default). Make the appropriate selections, and then click Next.

  8. In the Completing the Connection Wizard dialog box, review the settings. If you need to modify any of them, click Back as many times as necessary. If all the settings are correct, click Finish.

  9. In the Connect dialog box, click Connect to attempt the connection.

Saturday, March 27, 2010

Download Yahoo Messenger 10

Download Yahoo! Messenger 10

  1. Download Now Click Download Now to begin downloading and installing Yahoo! Messenger 10.
    ver. 10.0.0.1258
  2. When prompted, save the .exe file to your desktop. Then double click the Yahoo! Messenger 10 file on your desktop to begin installation.

Other versions: Mac, Web, Mobile, iPhone

Friday, March 26, 2010

Create a System Folder Easy Step

Windows Registry Editor Version 5.00

[HKEY_LOCAL_MACHINE\software\Classes\CLSID\{fd4df9e0-e3de-11ce-bfcf-abcd1de00000}]
@="IAMFOLDER"

[HKEY_LOCAL_MACHINE\software\Classes\CLSID\{fd4df9e0-e3de-11ce-bfcf-abcd1de00000}\defaulticon]

[HKEY_LOCAL_MACHINE\software\Classes\CLSID\{fd4df9e0-e3de-11ce-bfcf-abcd1de00000}\inprocserver32]
@="shdocvw.dll"
"ThreadingModel"="Apartment"

[HKEY_LOCAL_MACHINE\software\Classes\CLSID\{fd4df9e0-e3de-11ce-bfcf-abcd1de00000}\instance]
"CLSID"="{0afaced1-e828-11d1-9187-b532f1e9575d}"

[HKEY_LOCAL_MACHINE\software\Classes\CLSID\{fd4df9e0-e3de-11ce-bfcf-abcd1de00000}\instance\initpropertybag]
"Attributes"=hex:15,00,00,00
"Target"="C:\\"

[HKEY_LOCAL_MACHINE\software\Classes\CLSID\{fd4df9e0-e3de-11ce-bfcf-abcd1de00000}\shellfolder]
"Attributes"=hex:50,00,00,f0
"WantsFORPARSING"=""


Windows Registry Editor Version 5.00

[HKEY_LOCAL_MACHINE\software\Microsoft\Windows\CurrentVersion\Explorer\MyComputer\NameSpace \{fd4df9e0-e3de-11ce-bfcf-abcd1de00000}]

How to create a system folder in My Computer

System folder like My Document which appears in My computer are special folders which appear can not be deleted. Now if you want to create something like that, a folder which cannot be deleted!!!! . Here is how you do it to create a folder which cannot be deleted!!. It should work both in XP and VISTA.

However a word of caution, If you don’t know about registry, either back up or don’t try this. I am not sure how to create a direct script for this so be cautious.

Step 1: Create a Unique Key


  • Open registry with “regedit” command on run window.
  • Navigate to HKEY_CLASSES_ROOT\CLSID\. Then right click and create a new key with value as {FD4DF9E0-E3DE-11CE-BFCF-ABCD1DE12345}
  • Now set the default value of this key to the folder name you want to use. Now your path will look like ( I will call this as parent key throughout the discussion) HKEY_CLASSES_ROOT\CLSID\{FD4DF9E0-E3DE-11CE-BFCF-ABCD1DE12345}

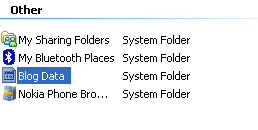
System Folder

Step 2: Add Custom Icon to the folder


  • Now create a sub key under parent key.
  • Name it as “DefaultIcon”.
  • Set the default value of this to the path of the icon image you want to use.
  • If you dont specify your icon, system will take default icon.

Step 3: Adding attributes


  • Under parent key create another key with name as “InprocServer32″
  • Set the default value as “shell32.dll”
  • Again at the same level create another folder as “ThreadingModel” and set its value as “Apartment”
  • Same way create another key (under parent level) at the same level with structure as \Shell\My Folder\Command
  • Set the default value here as “explorer /root,c:\Blog Data”
  • This has to be same which you gave when you created the first key.

Step 4 Adding Handlers


  • Under parent key, create another key as \ShellEx\PropertySheetHandlers\ {FD4DF9E0-E3DE-11CE-BFCF-ABCD1DE12345}
  • Similar way another key is to added to parent key as “Shell Folder”
  • In this right click and create new binary value called as “Attributes” with value as 00 00 00 00.

Step 5: Settings to place in My Computer


  • Go to HKEY_LOCAL_MACHINE\SOFTWARE\Microsoft\Windows
  • Then to \CurrentVersion\Explorer\MyComputer\NameSpace\
  • Add the parent key which in this case is {FD4DF9E0-E3DE-11CE-BFCF-ABCD1DE12345}

System Folder

Thats it, You are done. Try this carefully and I am sure there wont be any problem. I missed the icon thing somehow, but will sure fix it. Till then if you find a fix do tell me.

Update by Shaun:

How to fix the icon problem with system folder :

As per the icon issue, I had the same issue then realized it was just looking for the icon index at the end of the file path and is accomplished with a comma and your index number. If your using an .ico file the index will be 0 otherwise you’ll have to determine the index number if your using a dll or exe with multiple icons. i.e for an .ico file c:\path\Icon.ico

Wednesday, March 24, 2010

Virtual memory low error fixed

  • Click Start, then open the Control Panel.
  • Click Performance and Maintenance, and then click System.
  • Click the Advanced tab.
  • Under Performance, click Settings.
  • Click the Advanced tab.
  • Under Virtual memory, click Change.
  • Under Drive [Volume Label], click the drive that contains the paging file (virtual memory) settings that you want to change. In almost every case, this will be your C: drive.
  • Click to select the "System managed size" option, then click Set.
  • Click OK three times and restart your computer.

Friday, March 19, 2010

How to Download Embedded SWF files using Firefox

Downloading SFW Files – In the following tutorial I cover the process of downloading SWF (flash) files directly to your Computer using the built in Page info/Media functionality in Firefox. This enables a user to download any flash swf file that might be embedded in a webpage without using any additional software.

How to Download Embedded SWF files:

First off, if you don't already have it, you'll need firefox:
Firefox 3

  1. Open up Firefox and navigate to the Webpage that contains the embedded Flash SWF file that you would like to download
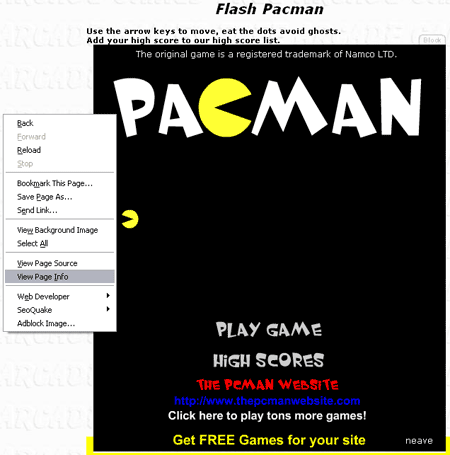
  2. Anywhere in the empty space on the page, right click and select the Page info option:
  3. Page Info

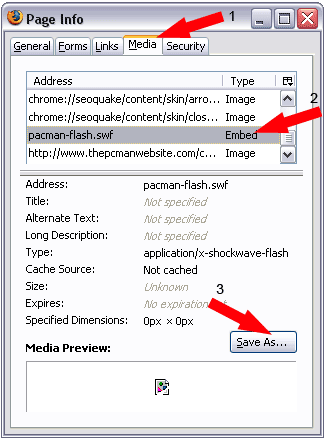
  4. Next, select the Media tab from the Page Info menu
  5. Scroll down the list and select the .swf file from the list. It should be listed as an embedded type
  6. Once the item has been selected, you can click the Save As button to save the .swf flash file to your computer:
  7. Saving Embedded SWF files to your PC

Note: If you want to play your .swf files that you have downloaded, I highly recommend THIS Flash Player. It can be run from a portable USB device as well.

Friday, March 5, 2010

Download Monster Trucks Nitro v2.1.0 Portable

Drive massive Monster trucks over crazy cool tracks . Monster trucks plus jumps plus stunts plus physics plus nitro-boosts should amount to a game that is more fun than this actually is. It�s a good distraction for sure, as long as you�re content with racing the same twenty-something tracks repeatedly in order to gain medals through faster finishing times, but MTN slips below the addictive, biker-maming pleasure that was apparent with Red Lynx�s previous product.


Monster Trucks Nitro v2.1.0 Portable

Monster Trucks Nitro v2.1.0 Portable


Feartures:
* Console class 3D game
* 24 fully dynamic tracks
* Be fast but use also your wits to pass the tracks
* Pass tracks fast enough to open next tracks
* Improve your times and earn medals
* Collect the Nitro tanks to unleash special powers!
* Unlock extra trucks!
* In-game leaderboards
* Rock solid playability
* Real Monster Truck physics
* Downloadable immediately!

DOWNLOAD hotfile

Configure Windows XP's Indexing Service the right way

If you’re like most Windows XP users, you’ve probably read that the Indexing Service is unnecessary and that disabling it will improve the operating system’s overall performance. Although these statements aren’t entirely true, most people buy in to them because they really don’t understand the benefits of using the Indexing Service.

If you regularly search for specific content in data files on your multigigabyte hard disk, the Indexing Service will definitely save you time and therefore can be considered a necessary service. In fact, I have literally thousands of articles in Word documents, and I’ve discovered that searching for content with the Indexing Service turns up results hundreds of times faster than using a standard search engine.

Furthermore, like a screen saver, the Indexing Service is designed to perform its intensive hard-disk indexing operations when the computer is idle. The service pauses whenever it senses activity from the keyboard or mouse, so it will never drag down system performance when you’re using your computer.

Of course, like all tools in the Windows operating system, the Indexing Service’s default settings can be tweaked in order to improve performance. For example, in its default configuration, the service is designed to search through all the files on your entire hard disk as it performs its indexing operation. However, the service is much more efficient if you redirect the indexing operations toward the directories, or folders, in which you store your data files.

In this blog post, we’ll show you how to redirect the focus of the indexing operations and discuss other ways you can configure the Indexing Service so that it performs more efficiently.

How it works

Let’s begin with a brief look at how the Indexing Service works. To provide such fast turnaround time, the service actually performs a comprehensive search operation during the indexing phase, when it goes through the files on your hard disk and gathers detailed information on each file. As it does, it creates a catalog, or database, of the results. When you run a search operation, you’re actually searching through the database rather than searching through the files on your hard disk.

To determine what types of files to search for and how to search them, the Indexing Service uses a set of preconfigured filters. By default, the service comes with filters for HTML files, text files, and all files created by Microsoft Office, including e-mail. The filter also allows the service to isolate the meaningful text from other content in the document, such as header and formatting information.

In addition to using filters to determine how to search a file, the service has a list of noise words — words that don’t need to be indexed. Words in the noise list include prepositions, common verbs, conjunctions, pronouns, individual letters, and numbers.

The service also gathers other pertinent information about the file. For example, it indexes standard information, such as file size, time and date stamp, and file type. More detailed information about a document includes word count, author, or even the last time the document was printed.

Works best on NTFS

While the Indexing Service will run on any hard disk regardless of the file system, it runs best on NTFS volumes, where it can take advantage of several advanced NTFS features. The most beneficial of these features is the NTFS Change Journal.

As its name implies, the Change Journal keeps a constantly updated log of any file deletions, additions, or modifications to all folders on the NTFS volume. The Indexing Service can consult with the Change Journal to help determine when new files have been added or when existing files have been modified; it can then proceed to update the index.

As you can imagine, a database of all the files on your hard disk could become extremely large. To deal with the size issue, the service stores its database using NTFS Sparse File, a feature that stores files in a way that requires much less disk space than if they were stored on a FAT-formatted hard disk.

Taking a look around

Now that you have a good idea of how the Indexing Service works, let’s take a look at its default configuration via the Indexing Service console.

To launch this console, go to the Run dialog box on the Start menu, type Ciadv.msc in the Open text box, and click OK. Once the console is up and running, select the Show/Hide Console Tree button on the toolbar to show the console tree. You’ll then see the screen shown in Figure A.

Figure A

By default, the Indexing Service is configured to index the entire hard disk.

Select the Directories folder in the tree to see a list of all the directories the service is configured to monitor. While these default settings ensure that data files on this computer will be included in the catalog, it forces the service to spend a lot of time searching through folders containing files that might not have the data you want to index.

For example, the C:\Windows folder on this particular system contains close to 17,000 files, which would take a lot of unnecessary time and disk space to index. The C:\Documents and Settings folder comes much closer to the data I’d like to index; however, this folder contains nearly 34,000 files, many of which aren’t data files.

Redirecting the indexing operations

To make the Indexing Service as efficient as possible, you should redirect the indexing operations to the My Documents folder, which contains all your data files. This will make the service much more efficient.

First, delete all the current entries in the Directories list by right-clicking on each and selecting the Delete command from the menu. As you do, the Indexing Service will prompt you to confirm the deletion.

To add an entry for the My Documents folder, go to the Action menu and select the New | Directory command. In the Add Directory dialog box, select the Browse button and type the path to the My Documents folder into the Path text box, as shown in Figure B. Then, click OK.

Figure B

You can redirect the Indexing Service so that it focuses on the folders containing your data files.

At this point, minimize the Indexing Service console, launch Windows Explorer, and locate the My Documents folder. Now, right-click on the My Documents folder to access the Properties dialog box. Click the Advanced button. In the Advanced Attributes dialog box, shown in Figure C, select the For Fast Searching, Allow Indexing Service to Index This Folder check box, and click OK.

Figure C

To ensure that the folders and files are ready for the indexing operations, you need to set the Index attribute.

To continue, click OK in the My Documents Properties dialog box. You’ll then see the Confirm Attribute Changes dialog box, shown in Figure D. Make sure the Apply Changes to This Folder, Subfolders and Files check box is selected and click OK.

Figure D

You’ll be prompted to confirm that you want to set the Index attribute for all subfolders and files.

Return to the Indexing Service console and select the Indexing Service on Local Machine folder in the tree. You’ll then see the main System catalog, as shown in Figure E. Now click the Start Indexing button on the toolbar.

Figure E

To initiate the indexing operation, just click the Start Indexing button on the toolbar.

The Indexing Service will begin the indexing operation, and you should leave your system site idle for a while. Ideally, you’ll allow the service to run while you’re at lunch or even overnight in order to give it time to build the index. While the indexing operation is running, the service will keep you apprised of its status, as shown in Figure F.

Figure F

While the indexing operation is ongoing, the Status column will show that it is scanning.

When the indexing operation is complete, the Status column will list the operation as Started, as shown in Figure G. You can then close the Indexing Service, launch the Search tool, and begin searching your indexed files.

Figure G

Once indexing is complete, the Status column will indicate that the index is ready to be searched.

Adding file types

As I mentioned, by default the Indexing Service comes with filters for HTML files, text files, and all files created by Microsoft Office. If you want to index other types of files, you can find and install custom content filters, also called IFilters. Because Microsoft’s SharePoint Server also uses IFilters, you can find them for a lot of common file types.

For example, you can download and install a free PDF IFilter from the IT solutions page on the Adobe Web site. You can download and install a free Visio IFilter from the Downloads page on the Microsoft Web site. From the 4-Share Web site, you can download a 30-day evaluation copy of an IFilter for ZIP files. You can also purchase a number of IFilters on the IFilterShop Web site.

Adding unknown extensions

You can configure the Indexing Service to index files with unknown extensions. In this case, the service will analyze the content of the files and try to locate pertinent information.

To do so, run the Indexing Service console as described earlier. Select the Show/Hide Console Tree button on the toolbar to show the console tree. Right-click on the Indexing Service on Local Machine folder in the tree and select the Properties command. In the Indexing Service on Local Machine Properties dialog box, select the Index Files with Unknown Extensions check box, as shown in Figure H, and click OK.

Figure H

If you want the Indexing Service to attempt to pull relevant information from unknown file types, you can enable the Index Files with Unknown Extensions check box.

Tuesday, February 9, 2010

download acer aspire Audio driver

Click the following links in order to download driver

 
UA-4607569-3