Social Icons

Thursday, April 24, 2014

Best Free DNS Servers for Public Access

Public DNS service is a free, global Domain Name System (DNS) resolution service that everyone in the world can can use as an alternative to his/her current DNS provider. It can be used in any TCP/IP stack equipped network appliances, tablets computers, desktop PC or smartphones. Once the free DNS service applied to the internet devices, all client programs running in the devices will perform all DNS lookups using the new Public DNS for a faster, accurate, secure and smooth web browsing experience.
DNS is the most important role in internet infrastructure, it works exactly like a phone book: every time when people trying to visit a website, the internet devices will perform a DNS lookup first and find out what the server’s destination IP address is. Since people may visit hundreds of websites every day, the DNS lookup’s performance and safety becomes significant to everyone.
Here are some best free public DNS services over the market, we reviewed all existings public DNS providers and pick up only those top performance ones. Do you want to dramatically speed up your web browsing experience, improve your network surfing security and always get the genuine web results without redirect ads contents? Pick up one of the public DNS servers below and start using it now.

Regular Best Free Public DNS Servers

Providers Primary DNS Server
Secondary DNS Server Server Location
Google 8.8.8.8 8.8.4.4 Mountain View, California, USA
OpenDNS 208.67.222.222 208.67.220.220 San Antonio, Texas, USA
Level3 209.244.0.3 209.244.0.4 Diamond Bar, California, USA
DNS Advantage 156.154.70.1 156.154.71.1 Sterling, Virginia, USA
Verizon 4.2.2.1 4.2.2.2 Routing to nearest Level3 nodes
SmartViper 208.76.50.50 208.76.51.51 Birminghan, Alabama & Tampa, Florida USA
OpenNIC Check here Check here Check links left for best DNS IP close to you

Free Public DNS Servers with Safe-Browsing Shield

Providers Primary DNS Secondary DNS Features Server Location
Norton ConnectSafe 1 198.153.192.40 198.153.194.40 Auto blocking malware, phishing & scams web sites Mesa, Arizona & Cupertino, California USA
Norton ConnectSafe 2 198.153.192.50 198.153.194.50 Same to 1 plus blocking pornographic web sites Mesa, Arizona & Cupertino, California USA
Norton ConnectSafe 3 198.153.192.60 198.153.194.60 Same to 2 plus blocking non-family friendly web sites Mesa, Arizona & Cupertino, California USA
Comodo Secure DNS 8.26.56.26 8.20.247.20 Auto blocking phishing, malware and spyware web sites Louisville, Kentucky & Charlotte, NC USA
Securly 184.169.143.224 184.169.161.155 Auto blocking adult oriented pages and web sites San Francisco, California USA
ScrubIT 67.138.54.100 207.225.209.66 Auto blocking pornographic and malicious web sites Idaho Falls, Idaho & Salt Lake City, Utah USA

Wednesday, April 23, 2014

Create a wireless bridge with a cheap TP-Link router

The TL-WR1043 router from Chinese manufacturer TP-Link is one of the most capable AND inexpensive routers on the market today.  With four Gigabit Ethernet LAN ports, Wireless-N, and a cost of only $54 (at the time of this writing), you cannot find a better value. And it efficiently solves a problem many people have: insufficient wireless coverage.
If your home is large or prone to Wi-Fi “dead spots” where the signal is weak, you can use a wireless bridge to help overcome these problems.  A bridge does exactly what it sounds like: it connects two Wi-Fi networks without the need for cabling. The bridge is nothing more than a second router that joins to your existing network, and extends its range. A bridge also increases the number of wired devices you can connect to your home network via the wired Ethernet ports on the back of it.  Anything you connect there is also connected to your home network,  enabling you to connect devices without onboard Wi-Fi, such as DVD players or game consoles.
To do this, you need two routers, a laptop, and an Ethernet cable. This article assumes one of those two routers is already setup and functioning as your primary Wi-Fi router, and the other is out-of-the-box, unconfigured TP-Link TL-WR1043 router . It will be referred to as the “bridge router” in this article. It is also recommended that you update the router to the latest firmware version from TP-Link before proceeding (3.13.4 Build 110429 Rel.36959n as of this writing)
Here is how you build the bridge:
1) Write down your existing wireless settings
Open up the web-based management console on your existing, primary router. Browse to the Wireless/Wireless Settings section and write down the values for channel, SSID, transmission mode, and the wireless security method and password in use. You will need these value later when you configure the bridge router.
2) Connect the bridge router
Connect the bridge router directly to your laptop with an ethernet cable plugged into any of its four LAN ports. Disable the laptop’s wifi connection, which will ensure your laptop is only talking only to the router. Power the router on, and your laptop should obtain an IP address from it.
3) Open the Administration console
Open a web browser and go to the bridge router’s administration page at 192.168.1.1; you will be prompted for the default password of admin/admin
4) Select the Wireless/Wireless Settings section.
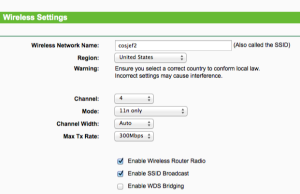
In this section, set a different Wireless Network Name (SSID) from the one used by your primary router. Then set all of the other settings on this page to match your primary router. After making these changes, you will be prompted to reboot the router, which you must do to ensure these changes take effect. After the reboot, move on to the next step.

5) Give the bridge router a different IP.
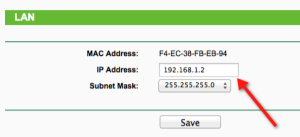
Open the router management console once again, and select the Network/LAN section. In this section, you will see that the router has a default IP address of 192.168.1.1, which is the same IP address as your primary router. In order to avoid an IP address conflict, change the IP address of the bridge router to 192.168.1.2.  You will need to reboot the router after making this change.

6) Setup the bridge
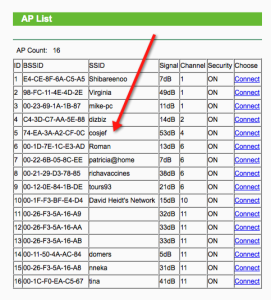
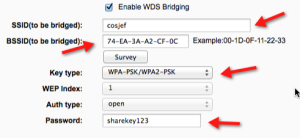
In the router management console, browse again to the Wireless/Wireless Settings section. This time, tick the checkbox entitled “Enable WDS Bridging.”  This will open a drop-down section with a number of new settings.  You will need to fill in the “SSID(to be bridged”) and the “BSSID(to be bridged)” sections. The fastest way to do this is click the “Survey” button. This will open a new window called “AP List” which shows you all the Wi-Fi networks in range. Look for your primary router in the list by its name (SSID), and click the “Connect” link on the right.

You will notice that the SSID and BSSID sections are now filled out properly. Now simply enter the wireless security values you copied from your primary router. It should look something like this, with the sections with red arrows filled in. Save the settings, and your router will reboot and join your existing Wi-Fi network.

7) Disable DHCP
Since your primary router will be handing out IP addresses on your network, you do not want the bridged router also trying to assume this role. Select the DHCP/DHCP Settings section, and disable the DHCP server.

Then choose the System Tools/Reboot section, and reboot the router for the last time.
8) Reconnect to your primary router.
Disconnect the Ethernet cable from the bridge router and reenable your Wi-Fi. You should now see two possible SSID’s for you to connect to: the primary router and the new bridge router. Connect to the primary router, as you would normally do.
9) Validate the bridge setup.
You can perform a few tests to ensure your setup is configured correctly:
a) Browse to the administration page on the primary router. Select the Wireless/Wireless Statistics section. In this section, you should see the MAC Address of your bridge router, and some values in the Received and Sent Packets counters, indicating the connection is working. It should look like this:

Note that the MAC address of your bridge router should be printed on the bottom of the device.
b) Browse to the 192.168.1.2 address, which is the management console of the bridge router. You should be able to resolve this address and login to the adminstration page on the bridge router without issue.
If both of these test pass, you should be reasonably certain your bridge is configured correctly and running.
10) Connect to the bridge
Now reset your Wi-Fi connection to the SSID of the bridge router.  You should be able to connect successfully, get an IP address through the primary router, and be able to connect to the Internet. You should also be able to connect a wired device to any of the LAN ports on the router and get to the Internet as well.

Thursday, April 17, 2014

Operation could not be completed (error 0x00000709) - Windows 7

Try these steps: 
1.      Delete/Remove the Printer Drivers from Program and Features.
Try to uninstall and reinstall Printer drivers and check if it works.
You must be logged on as an administrator to perform these steps.
a.      Open Device Manager by clicking the Start button, clicking Control Panel, clicking System and Maintenance, and then clicking Device Manager.If you are prompted for an administrator password or confirmation, type the password or provide confirmation.
b.      In Device Manager, locate the device you want to uninstall/delete and then right-click the device name and uninstall/delete it.
c.       Now restart the system
d.      And let Windows discover the device and install it automatically.
http://windows.microsoft.com/en-US/windows-vista/Add-or-remove-a-printer

2.      Update the chipset drivers (From the manufacturer’s website)
3.      Make sure the print spooler service is running
You can start the Print Spooler using the following procedure:
·         In the Administrative Tools folder (click Start, then Control Panel, then System and Maintenance and then Administrative Tools), open the Services snap-in.
·         Locate the Print Spooler service in the list of services and confirm that the status is Started. If it is not, select the service and on the Action menu, click Start.
·         Clear the print caches by following these steps:
 
1. Open "Computer" and browse to the folder

          "c:\windows\system32\spool\printers" and delete all the files in the folder.

2. Do the same to clear the content in the folder

           "c:\windows\system32\spool\drivers\w32x86"

3. Reboot.


4.      All the firewalls should be disabled or you can add an exception later
5.      Start the install wizard (Using a CD or drivers from the manufacturer’s website)
6.      Connect the Printer to system when the setup would ask for it
Also refer to this link for More Information:
http://windows.microsoft.com/en-us/windows-vista/Troubleshoot-printer-problems
http://windows.microsoft.com/en-us/windows-vista/Troubleshoot-network-printer-problems
http://social.answers.microsoft.com/Forums/en/vistahardware/thread/e6b3dfb3-647f-43e6-85d5-1edcc9780965

Hope this information was helpful.
Let me know if this worked.
All the best!

Thanks and Regards,

Browser Slow? How to Make Mozilla Firefox Fast Again


Have you noticed your usually speedy Firefox browser slowing down, or even crashing on you? Unnecessary plugins, extensions, and even browsing data can slow your browser down to a crawl, or make it crash. Here’s how to fix it.
I’ll show you how to speed up Firefox by disabling plugins and extensions and clearing the browsing data.

Disabling Plugins

Plugins help Firefox manage internet content such as Flash, Silverlight, Java, and Office, and there are probably many installed plugins you don’t need. Because they can slow down the browser, you can disable ones you are not using.
NOTE: Plugins cannot be deleted or uninstalled, only disabled. An exception would be a plugin that was installed as part of an extension and you uninstall the extension. Then, the plugin is automatically removed.
To disable a plugin in Firefox, click the Firefox button and select Add-ons from the drop-down menu.
01_selecting_addons
The Add-ons Manager opens on a new tab. Click the Plugins tab on the left side of the tab. For each plugin you want to disable, click the corresponding Disable button.
02_disabling_a_plugin
The disabled plugins display grayed out and the Disable button becomes an Enable button you can use to re-enable the plugin, should you want to.
NOTE: All disabled plugins are moved to the end of the list of plugins.
03_disabled_plugins
You should be safe disabling almost every plugin except for Flash, which is used on a lot of sites on the web.

Disabling Extensions

You can add all kinds of additional functionality to Firefox through the use of extensions, such as extensions to block advertisements, download videos, integrate with social networking sites, enhance Firefox features, and even add features available in other browsers. However, the more extensions you install, the slower Firefox can become. To speed up Firefox, you can disable extensions without having to uninstall them. That allows you to easily enable them again if you want to use them.
To disable an extension, click the Extensions tab on the left side of the Add-ons Manager. If you closed the Add-ons Manager after disabling plugins, open it again as described earlier in this article. Find the extension you want to disable and click the Disable button to the right of the description.
04_disabling_an_extension
Most extensions require you to restart Firefox to be disabled. If you get a restart message as shown in the following image, click the Restart now link.
05_clicking_restart_now
The disabled extensions are grayed out and the Disable buttons become Enable buttons allowing you to re-enable extensions at any time. Notice that the Option button is not available for disabled extensions. All the disabled extensions are moved to the end of the extensions list.
06_extensions_disabled

Uninstall Plugins

As mentioned earlier, plugins cannot be manually uninstalled from within Firefox, at least easily. However, most plugins come with their own uninstallation utilities. See the plugins article on the Firefox Help site for information on uninstalling various common plugins. If an uninstaller program doesn’t work for a particular plugin, there is a way to manually uninstall a plugin.

Remove Extensions

If you want to completely remove an extension, open the Add-ons Manager, if it is not already open, click the Extensions tab, and find the extension you want to remove in the list. Click the Remove button. If the restart message displays above the extension title, click the Restart now link to complete the removal process.
NOTE: You can remove an extension even when it’s disabled.
07_removing_an_extension

Clear Browsing Data

Firefox keeps track of sites you’ve visited, files you’ve downloaded, searches, form data, cookies, and more. All this data collects in the history database, and that database can get very large. There are several ways to clear your browsing data from the database.

Clear All Your Browsing Data

To clear your browsing data for all of your browsing activity for a certain amount of time, click the Firefox button and select History | Clear Recent History from the drop-down menu.
08_selecting_clear_recent_history
On the Clear Recent History dialog box click the down arrow to the left of Details.
09_clicking_details
Select the check boxes for the items you want to clear. Select a time range from the drop-down list at the top of the dialog box.
10_clear_recent_history_dialog
If you select Everything, a warning message displays telling you that the action cannot be undone. Be sure you want to clear your entire history of browsing data before clicking Clear Now to clear it.
11_clicking_clear_now

Clear Browsing Data for a Single Website

If you want to keep browsing data for some websites and not others, you can selectively choose to clear browsing data for specific websites. To do this, click the Firefox button and select History | Show All History from the drop-down menu.
12_selecting_show_all_history
The Library dialog box displays. In the tree in the left pane, click the time frame that corresponds to when you visited the website for which you want to clear the history. All the websites you visited during that time frame display in a list in the right pane. Right-click on the desired website in the list and select Forget About This Site from the popup menu.
If you have a long list of sites, you can use the Search History box to find the desired website.
NOTE: There is no confirmation for this action, so be sure you want to delete the browsing data for a website before you do it.
13_selecting_forget_about_this_site
To close the Library dialog box, click the X button in the upper, right corner.
14_closing_library_dialog

Clear Browsing Data Automatically When Firefox Closes

To clear your browsing data automatically every time you close Firefox, click the Firefox button and select Options from the drop-down menu.
NOTE: It doesn’t matter whether you select Options on the main menu or the Options submenu.
15_selecting_options
On the Options dialog box, click the Privacy button on the toolbar. Select Use custom settings for history from the Firefox will drop-down list in the History section.
16_selecting_use_custom_settings_for_history
Additional options display. Select the Clear history when Firefox closes check box so there is a check mark in the box. Click the Settings button.
17_clicking_settings
On the Settings for Clearing History dialog box, select the items you want to clear when you close Firefox. Click OK. You are returned to the Options dialog box. Click OK on that dialog to accept your changes.
18_settings_for_clearing_history
Now, enjoy speedy browsing with Firefox!
Monday, April 7, 2014

How To Download Instagram Photos on Your Phone and Computer

Instagram makes your photos look great. But did you ever wanted to download those stylish, cool, funny and beautiful photos from your own account/from a different Instagram user to your computer or Android phone? Even if you are not planning to use Instagram anymore, it is always a good idea to backup photos that you had uploaded on Instagram before. Here is how you can easily save Instagram photos to your computer and phone easily.
instagram

How to Download Instagram Photos from your Account online

Instaport
 Instaport
Instaport is an online service which allows you to easily download all your Instagram photos to your computer. The service is dead simple. You login with your Instagram account and chose to export your photos and videos. The processing takes some minutes and your download will be ready in zip format. Ta Da !
Copygram
Copygram
Copygram is a similar online service like Instaport which lets you download Instagram pics. The addition icing on the service is that it also provides a web interface to search through other user’s Instagrams and download them as well.

How to Download and Save Instagram photos on your Android Phone

When you install Instagram app on Android, it automatically downloads and saves the Instagram pics from your account to your phone. A typical download location of pictures from Instagram for Android is :
/sdcard/Pictures/Instagram
InstaSave
If you have reset your phone/formatted your SD card, or if you have uninstalled Instagram app on Android and just want to download all the photos from you Instagram account to your phone, you can use InstaSave app for Android
 InstaSave
The app is very small in download size and does what it promises. You login with Instagram account credentials and chose the photos you want to save to your phone. That’s it and your photos will be downloaded.

How to Download Instagram photos directly on your Computer

InstagramDownloader
InstagramDownloader is a small open source app which gives you a manual method to download all Instagram photos of a user (you can also download your own). You can download this application from here.
Instagramdownloader_app

The application is minimal and very easy to use, right after exracting it from zip file. You just need to enter the username and it fetches direct links to all Instagrams of a user. The links are saved in a text file (userid.txt) in the application directory. You can open the file, select any link and copy/paste in the web browser to get that photo directly.
Instagramdownloader

If you are wondering on how you can search for userid of other people on Instagram, the Android and iOS apps for Instagram provides you plenty of option ;)
Instagram
Free Instagram Downloader
Free Instagram Downloader is a free application which automates the process of downloading Instagram photos directly on your computer. The application has to be installed first. After installation it asks for Instagram id of the user :
freeinstagramdownloader
After giving the userid, it fetches entire list of Instagrams from that account. You are free to select some or download all the Instagram photos from that account now !
freeinstadownload_app
We encourage our readers to try out these applications and let us know which one they like the best and any problems they faced. Do you know of a better way to download photos from Instagram? Let us know in the comments too !

How To Disable ‘Seen’ for Facebook Messages and Messenger

Facebook has a pretty neat feature of letting you know if someone has read the messages you had sent them by showing ‘Seen’. While some may consider the feature as useful, it is a very easy way for someone to keep nagging you on Facebook. Yes you read that right ! Everyone you ‘friend’ on Facebook is not necessarily your friend or someone you actually want to talk to on a regular basis. You do not always want to reply to all the messages you get on Facebook. But what if someone had sent you a message on Facebook but you chose not to reply to them? The next time your ‘friend’ meets you in person, it is not going to be a pleasant conversation :D
facebook_last_seen
The ‘Seen’ feature in Facebook messaging is comparable to ‘Last Seen’ option on the popular messaging app Whatsapp (except that Whatsapp is too aggressive and shows the time whenever you use the app). Here’s how you can disable the ‘Seen’ feature on Facebook messages which will not cause any significant harm to anyone :

How To Disable ‘Seen’ for Facebook Messages and Messenger

Google Chrome

There are many extensions on the official Google Chrome Web store which you can install to disable this. These extensions are “one-click” install and disables the ‘Seen’ in Facebook messages without further effort. Click below to install one of the popular extensions :
Facebook Unseen
Messenger UNSEEN on Facebook
SeenBlock

Mozilla Firefox

Firefox already has a very powerful extension called GreaseMonkey which lets you edit the behaviour of websites and pages very easily using JavaScript.
First install GreaseMonkey from here
Then install this user script called Facebook Stealth

Other Browsers

If you are using a different web browser than Chrome or Firefox, you will need to either find ‘Developer Tools’ or some other way to add a URL filter/URL blocking. To block the Facebook ‘Seen’ for messages on other browsers, you just need to block the below URL:

/ajax/mercury/change_read_status.php$domain=facebook.com
 
There is no need to feel forced to reply to your ‘friends’ on Facebook anymore !

Recover Windows Product Key [All Versions]

A very small tool for find out what your Windows Product key is. Good for when you need to reinstall windows but can't find your CD case.

A small tool for finding your Windows product key. No install required, just a single executable file.
Its open source so you can actually see what the program is doing with your key :P

- The only requirement is that you have .NET 2 installed.
- Build in C#.
- Absolutely Free. :)
- Cool design (i hope :S )

Works in XP, Vista and Windows7

logo.gif

Have any comments ??, then please write them in discussions... I'll be glad to hear from you.

Click here to start download

Windows Essentials offline for windows 7, Vista, Xp

To install Windows Essentials while offline

  1. Use the installer file links provided on this webpage to find the one that corresponds to your operating system and language, and then click the link.
  2. When asked if you want to run or save the installer file, click Save, and then save the file to your desktop.
  3. To install Windows Essentials on the computer that you're using, click the wlsetup-all.exe file on your desktop, click Run, and then follow the instructions on the screen.
    -or-
    To install Windows Essentials on a different computer, copy the wlsetup-all.exe file to a portable storage device such as a Flash USB drive, and then copy the file to the other computer's desktop. Click the file, click Run, and then follow the instructions on the screen.

Legal information

Before installing Windows Essentials, review the following information.
Show all

Essentials installer files for Windows XP


 OR 

Click on This For Windows Xp & Windows 7

 
UA-4607569-3